2018 Fall Winter Coffee Lovers Blog Hop

Welcome to the 2018 Fall Winter Coffee Lovers Blog Hop! Whether your prefer hot chocolate, coffee, tea, or even a blended drink (which is what I ALWAYS prefer) and of course CREATIVE AWESOMENESS; you are going to really enjoy the 2018 Fall Winter Coffee Lovers Blog Hop!

There are a number of companies participating  in the 2018 Fall Winter Coffee Lovers Blog Hop and we are really honored and excited to be one of the SUPER SPONSORS & FLASH PRIZE SPONSOR for this amazing blog hop! We also have our own giveaways also right here on our blog! Be sure to read the WHOLE POST for the details!

To start at the beginning of the 2018 Fall Winter Coffee Lovers Blog Hop please click HERE.

The 2018 Fall Winter Coffee Lovers Blog Hop runs Friday, November 30 starting at 6:00 AM Pacific Time thru Friday, December, 1st. This allows you PLENTY of time to participate by hopping, creating or BOTH!

Winners for the entire hop will be posted on the blog Sunday, December 9th HERE.

If you aren’t familiar with the Coffee Loving Papercrafters Group and would like to learn more, be sure to join their Facebook Group HERE to ensure you get the latest info on all of their blog hops! The group is SUPER fun with awesome creativity and inspiration throughout the year and of course.. GREAT SEASONAL HOPS with WONDERFUL COFFEE inspiration! We would hate for you to miss out on the inspiration and possibilities!!

Now, onto the projects we have for you today! The theme is Coffee, Tea, and Cocoa with a Winter and Fall theme! 


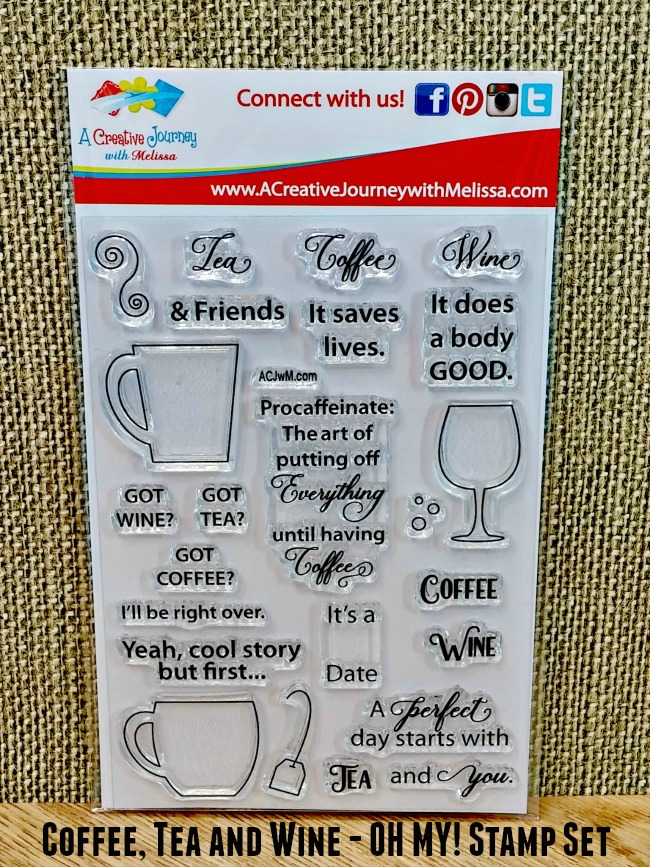
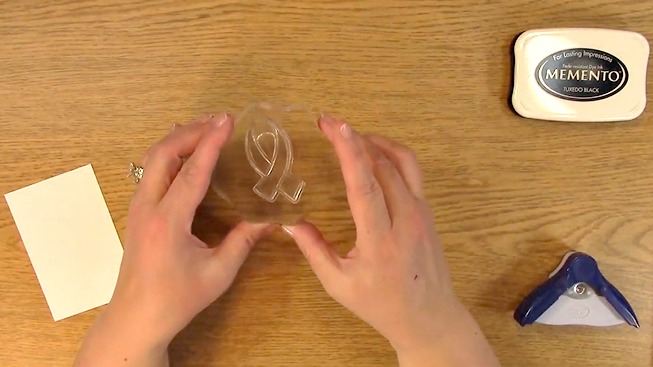
I used the A Creative Journey with Melissa Coffee, Tea and Wine – OH MY! , A Creative Journey with Melissa Coffee is my Liquid Therapy stamp set and the A Creative Journey with Melissa Sign Language Alphabet stamp sets on my projects.

My style is Cute, Clean and SIMPLE. I like to create things that look cute but I LOVE spending time with my family. I try to create things that can be done expeditiously and often times in mass quantities. The easier, the better!

When I created these projects, I had small gifts in mind for teachers, friends, neighbors or anyone that you would like to show them you care by giving them a handmade gift but also fits in my budget.

This cute little gift holder works perfect for Tea, Coffee, Hot Chocolate or any little gift you would like to dress up. I used our A Creative Journey with Melissa Sign Language Alphabet tp create the letters for this creation. I love how adding sign language to a creation really brings me joy! My brother and both of my paternal grandparents are/were deaf. Such a BEAUTIFUL LANGUAGE!

Do you want to see how this is made? Be sure to come back on Monday for my #MondayswithMelissa and you will see how I made this creation step by step. Not only will you have a video to refer to, you will have step by step instructions with pictures. Whichever way you prefer to learn, we have you covered! Be sure to subscribe to our YouTube Channel, Blog/Newsletter  so you don’t miss it!

Here is the surprise! You have a little packet of Hot Chocolate inside! You could add your homemade popcorn, chocolates, tea or anything else that you would like! SO CUTE!

This adorable creation has a surprise as well! I used the cup and tea bag label from the A Creative Journey with Melissa Coffee, Tea and Wine – OH MY! stamp set.  I used the heart for the tea bag label from the A Creative Journey with Melissa Coffee is my Liquid Therapy stamp set.

I used the ribbon as a pulley. This pulls the tea bag out for use! Cute, simple and fast, right?! Just the way I like my crafts and I hope you do too!

For our giveaway for this hop on our blog we will be giving away two $15.00 store credits for two winners! That way you can decide exactly what you want!

For all of our giveaways including this one, in order for you to qualify for an entry to win, you would need to be a follower on YouTube, subscribe to our mailing list/blog posts (found on our blog page) and you may also comment on this blog post for an additional entry to win! When you subscribe, you will receive an e-mail on Mondays with our latest blog post. BE SURE TO READ IT to check to see if you are a winner EVERY WEEK. If you do not contact me within two weeks of the announcement of winning, you will forfeit your prize. NO EXCEPTIONS. Thank you for your understanding.

NOTE: If you are subscribed with two different names and I am unable to match you with your subscription to the blog and the YouTube Channel, you will be ineligible to win as I can’t decipher if you are a matching subscriber to both. Thank you for your understanding.

For our blog winners for this blog hop will be announced on our blog post on Monday December 10, 2018. This is open to everyone, not only the US! 

Don’t forget to use the coupon code CoffeeLover2018 to save 25% on your purchase!

We hope you will subscribe to our YouTube Channel, Blog/Newsletter updates and check out our website!

Happy Hopping and we hope you enjoyed going on A Creative Journey with Melissa.

melissa-written-signature

Epilepsy Awareness Month Project

Did you know that Epilepsy Awareness Month is November? Join me as I create an Epilepsy Awareness Month Project which is an Epilepsy Awareness Card. My son’s girlfriend is studying to be a nurse. Unfortunately, she has first hand experience with Epilepsy as her brother has epilepsy.

I thought it would be a good idea to create awareness for this very important cause. One of the things that I learned is do not put anything in or around their mouth.

They will not choke on their tongue. Years ago I remember hearing that. It probably started years back when we weren’t educated about this condition and that is why I wanted to share it with you. I found a lot of helpful information here. Educate yourself so that you can be prepared if you need to be a helping hand when someone is having a seizure.

Are you ready to start the Epilepsy Awareness Month Project? Let’s get started.

Supplies Needed for the Epilepsy Awareness Month Project

A Creative Journey with Melissa Awareness Ribbon Set #1

Acrylic Block

Scissors

Twine

Marker

Ink

Adhesive

Corner Rounder

Rhinestones

Paper to stamp on

Card Base

Rhinestone Tool (optional)

Take out your A Creative Journey with Melissa Awareness Ribbon Stamp Set #1.

Place your stamp on your acrylic block.

Ink your image.

Stamp your image on your paper.

Here is a close up of the Awareness Ribbon we are using for the Epilepsy Awareness Month Project.

Choose the sentiment for your ribbon. Place it on your acrylic block a little bit rounded so it fits well inside the image.

Ink your stamp ensuring the entire sentiment is covered with ink.

Stamp the inside of the Awareness Ribbon with your chosen sentiment.

Here is a close up of the Epilepsy Awareness Month Project so far.

Using your favorite purple marker or coloring tool, color the inside of the ribbon shown on the finished project.

I used my crayola marker for lettering. The color is fabulous and I really like how it came out!

This shows you what the ribbon looks like once I colored it. I colored the Epilepsy Awareness Month Project on the right side a bit darker. I did most of it with two layers of color and the right image is a little lighter only coloring one layer.

Using your twine, wrap it around your sentiment paper. I wrapped it three times and then tied a bow. What do you think?

Take out your rhinestones and place three on the bottom of the Epilepsy Awareness Month Project ribbon on the right side as shown.

Using the corner rounder, round the corners to your liking. For the example card, I rounded the top left and bottom right corners. For the Epilepsy Awareness Month Project shown in the video, I rounded the bottom of the card.

Apply adhesive to the back of your sentiment and image.

Place your sentiment and image on your card base.

The Epilepsy Awareness Project is complete!

If you are looking for a great coupon code good only for today, November 26th 2018, you have to listen to the video 🙂 Trust me, it’s worth it!

This weeks giveaway is the A Creative Journey with Melissa Awareness Ribbon Set #1. It is perfect for any awareness cause.

For all of our giveaways including this one, in order for you to qualify for an entry to win, you would need to be a follower on YouTube, subscribe to our mailing list/blog posts (found on our blog page) and you may also comment on this blog post for an additional entry to win! When you subscribe, you will receive an e-mail on Mondays with our latest blog post. BE SURE TO READ IT to check to see if you are a winner EVERY WEEK. If you do not contact me within two weeks of the announcement of winning,you will forfeit your prize. NO EXCEPTIONS. Thank you for your understanding.

NOTE: If you are subscribed with two different names and I am unable to match you with your subscription to both the blog and the YouTube Channel, unfortunately you will be ineligible to win as I can’t decipher if you are a matching subscriber to both. Thank you for your understanding.

Last weeks giveaway is a $15.00 store credit for anything at our store!

The winner is Sue R.!

Winner, please send me an message HERE and I will get your prize out to you!

We hope you will subscribe to our YouTube Channel, Blog/Newsletter updates and check out our website!

Thank you for joining us and we hope you enjoyed going on A Creative Journey with Melissa.

melissa-written-signature


SAVE MONEY Create Your Own Holiday Gift Photo DVD Holder

SAVE MONEY Create Your Own Holiday Gift Photo DVD Holder is what we have for you today. I don’t know about you but I take A LOT of pictures of my boys and sometimes I forget to post or share them with loved ones. What better way to create something a loved one will enjoy but a DVD or CD full of photos?! Great idea right? Where would you put it once you created it you ask? That’s what we are doing today! SAVE MONEY Create Your Own Holiday Gift Photo DVD Holder!!

Supplies Needed for the SAVE MONEY Create Your Own Holiday Gift Photo DVD Holder Project

Decorative Card Stock

CD or DVD envelope

Velcro

Adhesive

6″ Square Envelope

Scissors

This is the SAVE MONEY Create Your Own Holiday Gift Photo DVD Holder Project.

Your SAVE MONEY Create Your Own Holiday Gift Photo DVD Holder Project has a velcro tab so that you can open it with ease.

Once opened, you will see the CD or DVD envelope holder. On the right side it allows for a lovely personal message to your loved one that is receiving your gift!

Close your Holiday Gift Photo DVD Holder Project. Let’s get started on the SAVE MONEY Create Your Own Holiday Gift Photo DVD Holder Project!

Take out your trimmer.

Take out your 12 x 12 piece of decorative paper for your SAVE MONEY Create Your Own Holiday Gift Photo DVD Holder.

This is my Stampin Up paper trimmer. It comes with both the scoring blade and cutting blade. The scoring blade is light gray and the cutting blade is dark gray.

My friend Brandie and previous Creative Crew Member is a rep for Stampin Up! If you like this trimmer (I LOVE IT!) and want to see how to purchase this, check out my friend Brandie’s Website HERE.

Taking your 12 x 12 paper, you will want to cut 5.75″ off of the paper. You can create two of the SAVE MONEY Create Your Own Holiday Gift Photo DVD Holder Project with just one piece of paper!

You now want to trim your paper to 11.5″. Be sure to keep the extra piece you trim off. You will use it for the SAVE MONEY Create Your Own Holiday Gift Photo DVD Holder Project.

This is what it will look like once it has been trimmed and the extra piece you will need for this project.

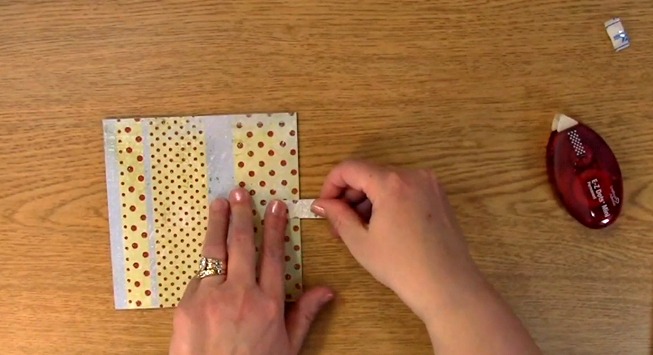
Take your 5.75″ x 11.5″ paper and fold it in half as shown.

Take out the extra piece you saved from trimming the paper. Cut a piece approximately 1.5″ – 2″ and set it aside.

Take out your CD or DVD envelope. You will not need the flap of your envelope for this project.
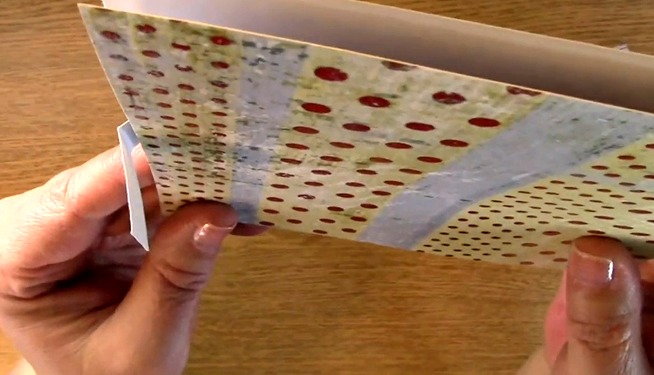
You will want to cut off the flap of your envelope.

If you want, you can leave it like this or cut the little edge off so it is the same on both sides. I liked it better with the latter.

Using your adhesive, apply it to the back of the CD or DVD envelope. Make sure you get all four corners of the envelope but do not apply adhesive too close to the opening of it.

Apply your envelope to the inside of your card as shown.

Here is where you will place your DVD or CD gift for your SAVE MONEY Create Your Own Holiday Gift Photo DVD Holder Project.

Take out your folded decorative paper and your small piece of paper you trimmed.

Apply adhesive to one side of the small piece of paper. Be sure it is not the decorative side.

Place the paper on the back of the card. Be sure you check where the envelope is and that it won’t be upside down.

Fold the paper in allowing space for the CD or DVD when closed on your SAVE MONEY Create Your Own Holiday Gift Photo DVD Holder Project.

Be sure you leave space for the  velcro.

Take out your velcro and be sure it is lined up before you place it down.

Peel off the adhesive and place it on the paper.

This is a close up of what it will look like before adhering it to  your card front.

Press down firmly on the velcro ensuring it’s adhesion.

This is what it looks like open once you have completed the creation.

This is where you would put your photo CD or DVD.

Here you can see where there is a little bit of bulk so making sure you have left enough space will keep the project from ripping.

If you chose to mail this, be sure you account for extra postage when sending the 6 x 6″ envelope. You may also want to add a little bit of padding inside the envelope to avoid breaking the disc.

This weeks giveaway is a $15.00 store credit for anything at our store!

For all of our giveaways including this one, in order for you to qualify for an entry to win, you would need to be a follower on YouTube, subscribe to our mailing list/blog posts (found on our blog page) and you may also comment on this blog post for an additional entry to win! When you subscribe, you will receive an e-mail on Mondays with our latest blog post. BE SURE TO READ IT to check to see if you are a winner EVERY WEEK. If you do not contact me within two weeks of the announcement of winning,you will forfeit your prize. NO EXCEPTIONS. Thank you for your understanding.

NOTE: If you are subscribed with two different names and I am unable to match you with your subscription to both the blog and the YouTube Channel, unfortunately you will be ineligible to win as I can’t decipher if you are a matching subscriber to both. Thank you for your understanding.

Last weeks giveaway is the A Creative Journey with Melissa Fall & Winter Holiday Sentiments Stamp Set. This set is PERFECT for your holiday tag creations!!

The winner is Kathy S.!

Winner, please send me an message HERE and I will get your prize out to you!

We hope you will subscribe to our YouTube Channel, Blog/Newsletter updates and check out our website!

Thank you for joining us and we hope you enjoyed going on A Creative Journey with Melissa.

melissa-written-signature

Punch Out Your Scrap Pile MAKE TAGS

Spellbinders Tool n One Overview and Giveaway

Sign Language Halloween Card

Breast Cancer Awareness Creation with Custom Colored Rhinestones

Down Syndrome Awareness Month Card

HSN Kelly Creates Hand Lettering Bundle Reveal Part Two

HSN Kelly Creates Hand Lettering Bundle Reveal