
Color Designs – Tim Holtz Adirondack Ink and an Embossing Folder
Color Designs – Tim Holtz Adirondack Ink and an Embossing Folder is what we have for you today. How would you like to create your own backgrounds with color and adding texture? That is exactly what we are going to do today!
First, I want to ask for your help. Tracy Zahm who was on our Creative Crew has asked for help. Her best friends nephew had a life altering accident. She has asked if everyone could send a card. He really enjoys getting cards and thought it would be a great way to cheer him up. If you could do this and feel free to share, that would be AWESOME!
Please send the cards to:
Chad Mason
C/O Shirley Ryan Ability Rehab
Room # 2522
355 E Erie Chicago, IL, 60610
Are you ready? You can use the Color Designs – Tim Holtz Adirondack Ink and an Embossing Folder technique on a card for Chad! Let’s get Creative!

Supplies Needed for Color Designs – Tim Holtz Adirondack Ink and an Embossing Folder
Isopropyl Alcohol
Aqua Tim Holtz Adirondack Ink
Sandal Tim Holtz Adirondack Ink
Red pepper Tim Holtz Adirondack Ink
Paper Towel ( I also used a Clorox wipe with the alcohol)
White Paper
Oxford Cuttlebug Embossing Folder

To begin your Color Designs – Tim Holtz Adirondack Ink and an Embossing Folder technique take out your embossing folder, inks and paper.
NOTE: On all embossing folders they have two sides to them that you then sandwich your paper in between them. The Embossed side will have the creation poking out toward you when it is done with the ink on that side. The Debossed side will have the indented side toward you when it is done with the ink on that side. Make sure you put your ink on the side you want the type of embossing/debossing done.
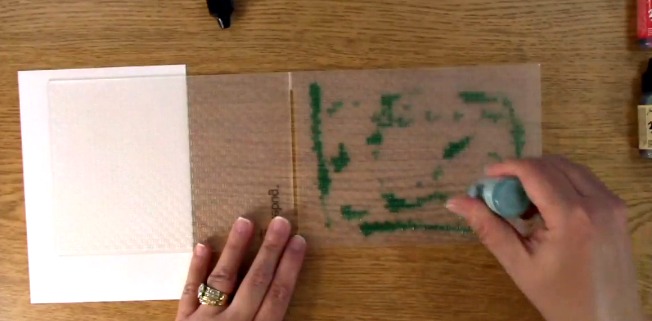
Uncap your Aqua Ink and put various spots of ink on the side of the embossing folder you want to use for your creation. You can make it in a pattern or just a random look is nice too. Be sure to recap it once you are done.
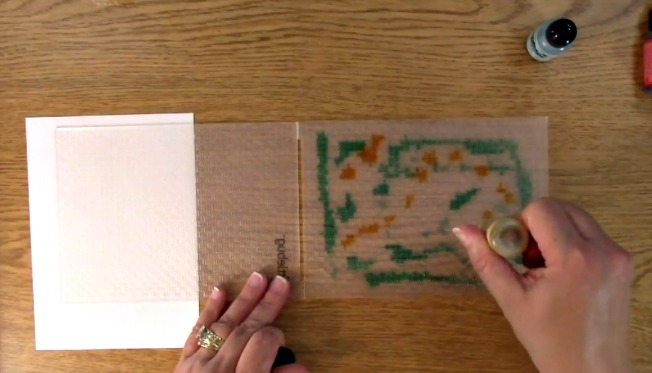
Uncap your Sand ink and put various spots of ink on the side of the embossing folder you want to use for your creation as you did with the previous color and recap it.

Take out your Red Pepper ink, uncap it and put various spots of ink on the side of the embossing folder you want to use for your creation as you did with the previous colors and recap it.

Place your white paper on top of the inked area. Press down with your hand so the paper is in place and starts to make it’s design.

Close the embossing folder. Get out your manual die cut machine and the proper platforms.

Place all but the clear platform down on your sizzix manual die cut machine (or a like machine.) Put your embossing folder on top of the main platform as shown.

Place your clear platform on top of the embossing folder.

Run your embossing folder and appropriate platforms through your manual die cut machine.

The ink has soaked through the back of the paper of your Color Designs – Tim Holtz Adirondack Ink and an Embossing Folder technique. This is the BACK of the design.

This is the front of the design for the Color Designs – Tim Holtz Adirondack Ink and an Embossing Folder technique. Both look equally as great! The only difference is the texture.

Here is a close up of the texture and color.

Here are both of my examples. On the one to my right, I used more ink and less on the left one.

You are probably thinking to yourself GREAT Color Designs – Tim Holtz Adirondack Ink and an Embossing Folder technique Melissa but now what do I do with this multi colored embossing folder?

Don’t worry! I have you covered! This is where the Isopropyl Alcohol comes in. You are going to pour a small amount on your embossing folder. Using a sturdy rag (I used a clorox wipe with the alcohol. The paper towels will shred from the texture of the embossing folder) wipe off both sides of the embossing folder.

One cleaned with alcohol, use a paper towel to pat dry the inside. If you still see some ink on your embossing folder, repeat. ALL of the ink will come off.

You are all set with your Color Designs – Tim Holtz Adirondack Ink and an Embossing Folder technique and have already cleaned up!
Now, for the GIVEAWAY!

This week for our Giveaway, we are giving away the Oxford Cuttlebug Embossing Folder as used in the video and tutorial above.
To qualify to win, you must be BOTH:
A public follower on YouTube, subscribe to our mailing list/blog posts and you may also comment on this blog post for an additional entry to win!
If you do not contact me within two weeks of the announcement of winning, you will forfeit your prize. Thank you for your understanding.
NOTE: Be sure you are subscribed with matching names. If I am unable to match you with your subscription to both the email list and the YouTube Channel, you will miss your chance to win a prize. If I can’t decipher if you are a matching subscriber (if your profile doesn’t show publicly who you subscribe to) and I can’t confirm you have subscribed to both, I won’t be able to enter you in for the prize. **DO NOT COMMENT WITH YOUR ENTIRE EMAIL ADDY. Only give me the first 6 NOT INCLUDING YOUR HOST. Just enough for me to match your name will work perfectly.

