Tag Archive for: Creative Gift ideas

Explosion Mini Scrapbook Part 1

Explosion Mini Scrapbook Part 1 is what we have for you today. I love to create items for loved ones and this is a great way to give a gift from the heart! Once you create one.. You will be obsessed.. I apologize now! LOL Let’s get started!

The first lesson I have learned from creating these is DO NOT USE WIRED RIBBON for your closure. It falls apart as you can see.


This is the front of the Explosion Mini Scrapbook Part 1.

Here is the side view of the Explosion Mini Scrapbook. I will be showing you step by step how the Explosion Mini Scrapbook opens up and OH MY the possibilities!

As you can see it starts to unfold and you can see the added decor inside the Explosion Mini Scrapbook Part 1.

This is the inside of the Explosion Mini Scrapbook Part 1. I love the colors and decor and how it coordinates with the whole project.

Here is the left side of the Explosion Mini Scrapbook Part 1.

This is the middle of the Explosion Mini Scrapbook Part 1.

Here is the right side of the Explosion Mini Scrapbook Part 1.

This is the back of the Explosion Mini Scrapbook Part 1. You have so many places to put journaling and pictures!

Today, we are showing you how to create the front and back covers for your Explosion Mini Scrapbook. This is the front side of your covers.

This is the inside of the cover.

I started with a 5.5″ square piece of mat board. I purchased this at Aaron Brothers which now has been bought out by Michael’s in my area. You can use chip board but I would suggest you use a thicker piece to ensure durability.

Measure your decorative paper one inch larger than your mat board. This paper is 6.5″ square.

Apply adhesive to your at board.

Place your mat board onto the paper centered.

Using your sturdy work surface, fold your paper on the corners of the mat board.

This is what it will look like when you do one side. Repeat for all four sides.

Once you have folded in all four sides, cut a triangle off the corners. This will give you a cleaner edge for the corners.

Apply adhesive to the paper and to your mat board to ensure adhesion.

Fold your paper and press the adhesive to the mat board. Repeat for the opposite side.

Cut all four corners of the paper on the non adhered paper.

You need to cut them like this.

Trim off the triangle as shown.

Fold in your paper as shown above.

Apply adhesive to the paper and mat board. Press the paper firmly onto the mat board. This is what it looks like once it is done.

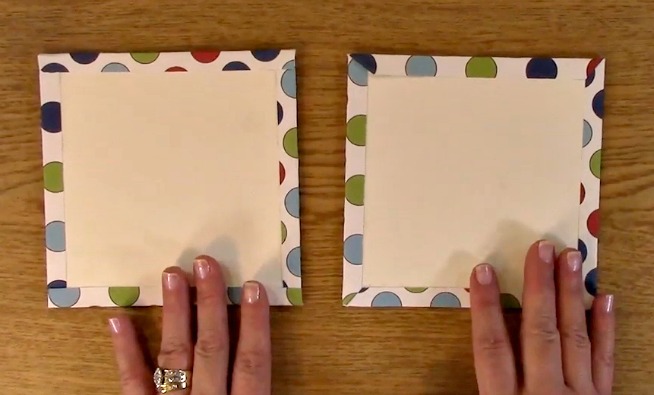
Here I have done the edges two ways. Beveled edge or the square edge. I really don’t have a preference besides they are going to be covered by the inside paper anyway so it really is your preference.

This is a close up of the beveled edge.

If you want to have the beveled edge, you can do this by trimming off a triangle from the paper as shown above.

Here is a close up of both corners. Which do you like best?

Here is the completed front and back covers! Are you excited for the next video? Be sure to stay tuned where I show you how to cover these covers with clear shelf liner… YES I FINALLY REMEMBERED WHAT IT IS CALLED!! LOL

For this weeks giveaway, we are giving away $15 credit to our store!

For last weeks giveaway, we are giving out Words of God stamp set!

The winner is Jensie.

Please be sure that you  send me a message letting me know which post you won on and your contact info and I can get your prizes out to you!

Winners, please send me an message HERE and I will get your prize out to you!

For all of our giveaways including this one, in order for you to qualify for an entry to win, you would need to be a follower on YouTube, subscribe to our mailing list/blog posts (found on our blog page) and you may also comment on this blog post for an additional entry to win! When you subscribe, you will receive an e-mail on Mondays with our latest blog post. BE SURE TO READ IT to check to see if you are a winner EVERY WEEK. If you do not contact me within two weeks of the announcement of winning, you will forfeit your prize. NO EXCEPTIONS. Thank you for your understanding.

NOTE: If you are subscribed with two different names and I am unable to match you with your subscription to the blog and the YouTube Channel, you will be ineligible to win as I can’t decipher if you are a matching subscriber to both. Thank you for your understanding.

We hope you will subscribe to our YouTube Channel, Blog/Newsletter updates and check out our website!

As always, we appreciate your visit and we hope you enjoyed going on A Creative Journey with Melissa. 

melissa-written-signature

Holiday Handmade Treat Holders

Holiday Handmade Treat Holders is what we have for you today. During this time of year it seems that there is a never ending need for gifts between teachers, friends, family, etc. This creation is super easy to make and is a great way to show someone you care without breaking your bank!

Supplies Needed for the Holiday Handmade Treat Holders Project

A Creative Journey with Melissa Sign Language Alphabet stamp set

Acrylic Block

3-D Foam adhesive

Black Ink

Circle Punch and Label Punch

Adhesive

Stampin Up Top Note Die (Unfortunately, I believe it is retired but to be sure go to Brandie’s Stampin’ Up website and send her a message!)

Trimmer

Card Stock for Treat Holder

Coordinating Card Stock for circle mat

White card stock to stamp sentiment

This is the Holiday Handmade Treat Holders Project. I really love the color palette and how the sign language stamps convey the perfect message for the holidays!

This is the side profile of the Holiday Handmade Treat Holders Project. You can put whatever item you wish for this and just adjust the size of the treat holder to fit your needs.

To begin your Holiday Handmade Treat Holders Project, take out your Top Note Die or the die of your choice.


Take your decorative paper and place it on the top of your die. Make sure that you have covered the area to be cut by your paper.

Place your clear platform, your die, your paper and then your other clear platform on your manual die cut machine. Run your die through your machine.

This is what it looks like once it has been cut.

Take out your trimmer and use the scoring blade and score your die cut in the middle. You can also fold this in half if you wish instead of using your trimmer.

This is what it looks like once it has been folded on the score line.

We are going to now score your paper for your treat bag. There will need to be three score lines where you will fold.

Did you know that most trimmers of ANY brand have a hidden arm underneath that allow you to expand your trimming size?

Here you will see the bottom of my Stampin’ Up! Trimmer. It also holds accessories as well! If you didn’t know this-check yours out!

I used a 12″ piece of paper. I scored the paper at 5″, 6″ and 7″.

This is what it looked like once I folded on the score line. It makes a “M” for Melissa! LOL

I used hot chocolate packs in my Holiday Handmade Treat Holders Project. You can place a small amount of adhesive if you wish it to be placed in a specific place or

you can place your item inside a bag and adhere it that way as well.

Take out your coordinating paper and punch your circle.

Using your punch label punch your sentiment paper.

Take out your A Creative Journey with Melissa Sign Language Alphabet stamp set, acrylic block and ink.

Place your first letter on the acrylic block and ink it.

Stamp your letter on the punched out label.

I chose to stamp the last letter on the label. That way I can get the middle letter centered between the two letters so they don’t look lopsided.

This is what the finished stamped letters looked like.

Using your 3-D adhesive, apply it to the back of your sentiment. Place it on the punched out circle as shown.

Apply adhesive to the back of your circle. Adhere your circle to the front of the Holiday Handmade Treat Holders Project.

When I cut this piece of card stock, it was a little wider than I wanted it to be for my project. 

I used the label die to approximate the size that I wanted to cut the treat holder down to.

Using my trimmer, I trimmed off approximately 1/2 inch off of the side of the treat holder project.

This looks much better and will be more cohesive for the project.

Apply adhesive to the inside of the die for the top of your creation. Be sure you apply adhesive to both sides.


Press firmly on both sides of the cut out die so the adhesive adheres to the Holiday Handmade Treat Holders Project.

I chose to use hot chocolate packets but you could really use anything. Here I used a packaged tea bag.

When placed inside the fold, it really won’t go anywhere. In the video I even shook it and it was staying put without adhesive!

Here are the completed Holiday Handmade Treat Holders Projects!


We are also participating in an awesome blog hop so if you would like to check it out please go here 2018 Fall Winter Coffee Lovers Blog Hop,

For this weeks prize, we will be giving away a $15.00 store credit! That way you can decide exactly what you want!

For all of our giveaways including this one, in order for you to qualify for an entry to win, you would need to be a follower on YouTube, subscribe to our mailing list/blog posts (found on our blog page) and you may also comment on this blog post for an additional entry to win! When you subscribe, you will receive an e-mail on Mondays with our latest blog post. BE SURE TO READ IT to check to see if you are a winner EVERY WEEK. If you do not contact me within two weeks of the announcement of winning, you will forfeit your prize. NO EXCEPTIONS. Thank you for your understanding.

NOTE: If you are subscribed with two different names and I am unable to match you with your subscription to the blog and the YouTube Channel, you will be ineligible to win as I can’t decipher if you are a matching subscriber to both. Thank you for your understanding.

For our blog winners for the blog hop , they will be announced on our blog post on Monday December 10, 2018. This is open to everyone, not only the US! 

Don’t forget to use the coupon code CoffeeLover2018 to save 25% on your purchase!

We hope you will subscribe to our YouTube Channel, Blog/Newsletter updates and check out our website!

As always, we appreciate your visit and we hope you enjoyed going on A Creative Journey with Melissa.

melissa-written-signature


Quick and Easy: Gift Bag Set with Stamped Tissue

Quick and Easy: Gift Bag Set with Stamped Tissue is today’s project! I have focused this project for the holidays but this simple and cute concept can be used for any gift giving need. It’s so simple in fact, you may have all of the supplies in your home already! This project is not meant to take a lot of time and supplies. This project is meant for you to be able to dress up a gift with love and thought with little cost and time. The love will show through and your friend and loved one will be so grateful! Sooooo, let’s get started!

The supplies you will need:

Snowflake Beauty Stamp Set

Adhesive

Stamp block

Brilliance Ink

Plain gift bag

Tissue paper

Decorative card stock for bag

Directions and the free printable download for the tags can be found on this tutorial here.

supplies

Get your gift bag, adhesive and decorative paper out. measure two pieces of paper to fit on the front of bag

Apply adhesive to the back side of the decorative paper. Adhere to both the front and the back of the gift bag.

Be sure to line them up so they match on both sides. Set aside.

bag w paper

Take out your tissue paper, ink and Snowflake Beauty stamp set. Fold your tissue paper at an angle in half to make a triangle.

Stamp the corner area of this tissue paper. You will stamp all four corners of your tissue paper.

stamp paper

One you have stamped all four corners, take your tissue paper in the center of the paper and grab it as if to make a bouquet like shown.

take the stamped tissue paper in a bouquet

Open up your bag and place your tissue paper inside of the bag ensuring some of it is sticking out to show your stamped design.

bag completed

To add a little flair, create a matching gift tag for your gift packaging like shown below. For information and directions on the gift tag, please go to this post here for your free download and information.

final w tag

Thank you for joining us! Please be sure to subscribe to our blog and YouTube channel for more projects and ideas.

We hope you enjoyed going on A Creative Journey with Melissa.

melissa-written-signature