
Holiday Handmade Treat Holders
Holiday Handmade Treat Holders is what we have for you today. During this time of year it seems that there is a never ending need for gifts between teachers, friends, family, etc. This creation is super easy to make and is a great way to show someone you care without breaking your bank!

Supplies Needed for the Holiday Handmade Treat Holders Project
A Creative Journey with Melissa Sign Language Alphabet stamp set
3-D Foam adhesive
Black Ink
Circle Punch and Label Punch
Adhesive
Stampin Up Top Note Die (Unfortunately, I believe it is retired but to be sure go to Brandie’s Stampin’ Up website and send her a message!)
Trimmer
Card Stock for Treat Holder
Coordinating Card Stock for circle mat
White card stock to stamp sentiment

This is the Holiday Handmade Treat Holders Project. I really love the color palette and how the sign language stamps convey the perfect message for the holidays!

This is the side profile of the Holiday Handmade Treat Holders Project. You can put whatever item you wish for this and just adjust the size of the treat holder to fit your needs.

To begin your Holiday Handmade Treat Holders Project, take out your Top Note Die or the die of your choice.

Take your decorative paper and place it on the top of your die. Make sure that you have covered the area to be cut by your paper.

Place your clear platform, your die, your paper and then your other clear platform on your manual die cut machine. Run your die through your machine.

This is what it looks like once it has been cut.

Take out your trimmer and use the scoring blade and score your die cut in the middle. You can also fold this in half if you wish instead of using your trimmer.

This is what it looks like once it has been folded on the score line.

We are going to now score your paper for your treat bag. There will need to be three score lines where you will fold.

Did you know that most trimmers of ANY brand have a hidden arm underneath that allow you to expand your trimming size?

Here you will see the bottom of my Stampin’ Up! Trimmer. It also holds accessories as well! If you didn’t know this-check yours out!

I used a 12″ piece of paper. I scored the paper at 5″, 6″ and 7″.

This is what it looked like once I folded on the score line. It makes a “M” for Melissa! LOL

I used hot chocolate packs in my Holiday Handmade Treat Holders Project. You can place a small amount of adhesive if you wish it to be placed in a specific place or

you can place your item inside a bag and adhere it that way as well.

Take out your coordinating paper and punch your circle.

Using your punch label punch your sentiment paper.

Take out your A Creative Journey with Melissa Sign Language Alphabet stamp set, acrylic block and ink.

Place your first letter on the acrylic block and ink it.

Stamp your letter on the punched out label.

I chose to stamp the last letter on the label. That way I can get the middle letter centered between the two letters so they don’t look lopsided.

This is what the finished stamped letters looked like.

Using your 3-D adhesive, apply it to the back of your sentiment. Place it on the punched out circle as shown.
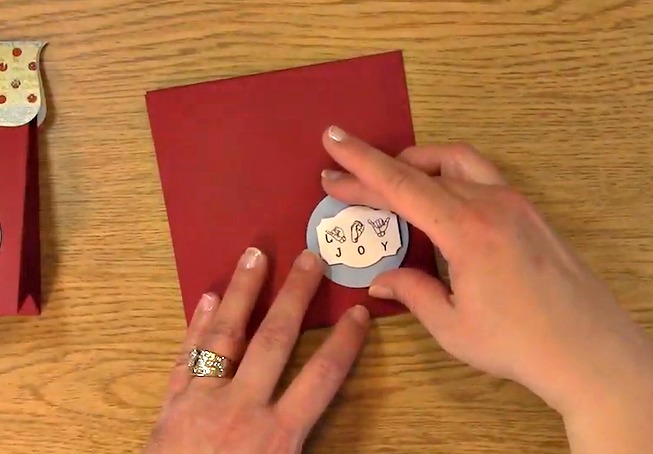
Apply adhesive to the back of your circle. Adhere your circle to the front of the Holiday Handmade Treat Holders Project.

When I cut this piece of card stock, it was a little wider than I wanted it to be for my project. 
I used the label die to approximate the size that I wanted to cut the treat holder down to.
Using my trimmer, I trimmed off approximately 1/2 inch off of the side of the treat holder project.

This looks much better and will be more cohesive for the project.

Apply adhesive to the inside of the die for the top of your creation. Be sure you apply adhesive to both sides.

Press firmly on both sides of the cut out die so the adhesive adheres to the Holiday Handmade Treat Holders Project.

I chose to use hot chocolate packets but you could really use anything. Here I used a packaged tea bag.

When placed inside the fold, it really won’t go anywhere. In the video I even shook it and it was staying put without adhesive!
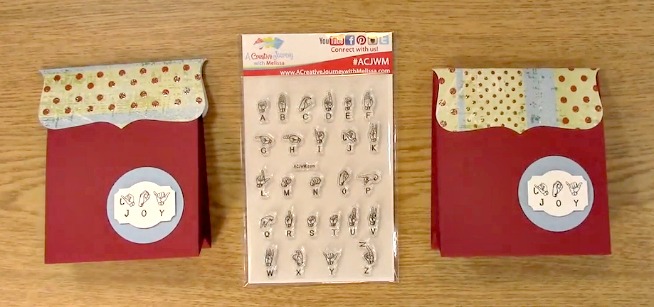
Here are the completed Holiday Handmade Treat Holders Projects!

We are also participating in an awesome blog hop so if you would like to check it out please go here 2018 Fall Winter Coffee Lovers Blog Hop,

For this weeks prize, we will be giving away a $15.00 store credit! That way you can decide exactly what you want!
For all of our giveaways including this one, in order for you to qualify for an entry to win, you would need to be a follower on YouTube, subscribe to our mailing list/blog posts (found on our blog page) and you may also comment on this blog post for an additional entry to win! When you subscribe, you will receive an e-mail on Mondays with our latest blog post. BE SURE TO READ IT to check to see if you are a winner EVERY WEEK. If you do not contact me within two weeks of the announcement of winning, you will forfeit your prize. NO EXCEPTIONS. Thank you for your understanding.
NOTE: If you are subscribed with two different names and I am unable to match you with your subscription to the blog and the YouTube Channel, you will be ineligible to win as I can’t decipher if you are a matching subscriber to both. Thank you for your understanding.
For our blog winners for the blog hop , they will be announced on our blog post on Monday December 10, 2018. This is open to everyone, not only the US!
Don’t forget to use the coupon code CoffeeLover2018 to save 25% on your purchase!
We hope you will subscribe to our YouTube Channel, Blog/Newsletter updates and check out our website!
As always, we appreciate your visit and we hope you enjoyed going on A Creative Journey with Melissa.
