

Using Ink with Embossing Folders
Using Ink with Embossing Folders is what we have for you today. I love using my embossing folders but I am always looking for new ways to use them. Today I am going to show you how to add ink to your embossed image two ways! TWO WAYS to dress up your embossed images!
Supplies Needed for the Using Ink with Embossing Folders Project
Embossing folder
Ink
Paper
Manual die cut machine

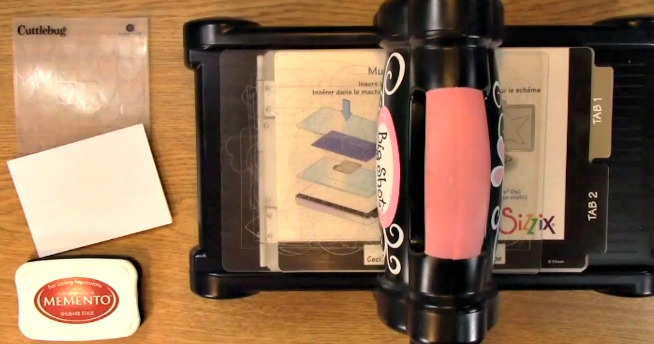
Take out your manual die cut machine and place the appropriate platform inside the machine. In this case, I am using the Sizzix Die Cut Machine. You will want to use the platform on tab 1.

Place your clear platform on top of your platform on tab 1.

Take out your paper and embossing folder. Place your paper inside the embossing folder in the center.

Take out your other clear platform and place it on top of the embossing folder.

Run your paper through your manual die cut machine. This is what it will look like once you have embossed your paper. I love the texture and design!

Open up your embossing folder and take out your ink.

Ink the inside of your embossing folder on whichever side you choose for your design.

Place your paper in the middle of the design inside the embossing folder.

Run your paper through the embossing machine.

This is what it looks like once you have embossed it. I love how the ink has transferred giving a water color look.

After using ink, be sure that you clean off your embossing folder. I used Memento ink and cleaned it right away . Sometimes different inks can stain so be sure you test it before using it. I have had great luck with Memento ink.

I used make up cotton circles to clean it off along with stampin up stamp cleaner.

Here you can see the embossing folder is clean and no longer has any red residue.

Take out your white embossed paper.

Using your ink, color your embossed paper with the ink pad directly onto the paper.

This is what it looks like! The left is the ink on the embossed folder and the right is with the ink placed directly on the paper. I really love how they both came out!

For our giveaway this week, you can win a store credit so you can pick out your favorite item in our store!

For last weeks giveway the first winner that is getting the A Creative Journey with Melissa Sign Language Alphabet stamp set is Maja.

Robyn is the second winner and she is getting the A Creative Journey with Melissa I Just Love You stamp set.
Please be sure that you send me a message letting me know which post you won on and your contact info and I can get your prizes out to you!
Winners, please send me an message HERE and I will get your prize out to you!
For all of our giveaways including this one, in order for you to qualify for an entry to win, you would need to be a follower on YouTube, subscribe to our mailing list/blog posts (found on our blog page) and you may also comment on this blog post for an additional entry to win! When you subscribe, you will receive an e-mail on Mondays with our latest blog post. BE SURE TO READ IT to check to see if you are a winner EVERY WEEK. If you do not contact me within two weeks of the announcement of winning, you will forfeit your prize. NO EXCEPTIONS. Thank you for your understanding.
NOTE: If you are subscribed with two different names and I am unable to match you with your subscription to the blog and the YouTube Channel, you will be ineligible to win as I can’t decipher if you are a matching subscriber to both. Thank you for your understanding.
We hope you will subscribe to our YouTube Channel, Blog/Newsletter updates and check out our website!
As always, we appreciate your visit and we hope you enjoyed going on A Creative Journey with Melissa. Have a wonderful holiday!


