
Explosion Mini Book Part 3
Explosion Mini Book Part 3 is what we have for you today. I am feeling much better after my surgery. I truly appreciate all of the prayers, cards and well wishes and I am looking forward to getting crafty again!
We are creating the inside part of the explosion mini book which will also show you how to fold the pages so it works properly!


Supplies Needed for the Explosion Mini Book Part 3 Project
3 – 10″ square pieces of card stock
Bone folder

We are going to be creating two additional folded paper pages for the Explosion Mini Book.
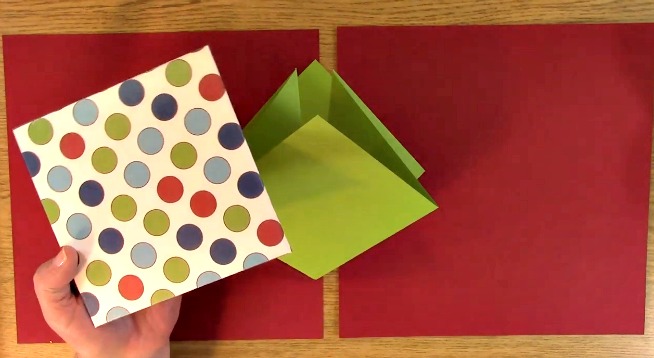
Here is one of the outside covers and if you haven’t seen our previous two posts, please check out Explosion Mini Scrapbook Part 1
and Explosion Mini Book Part 2.

*NOTE: When putting this together next week, do not use wired ribbon. It doesn’t wear well. #Lessonlearned.

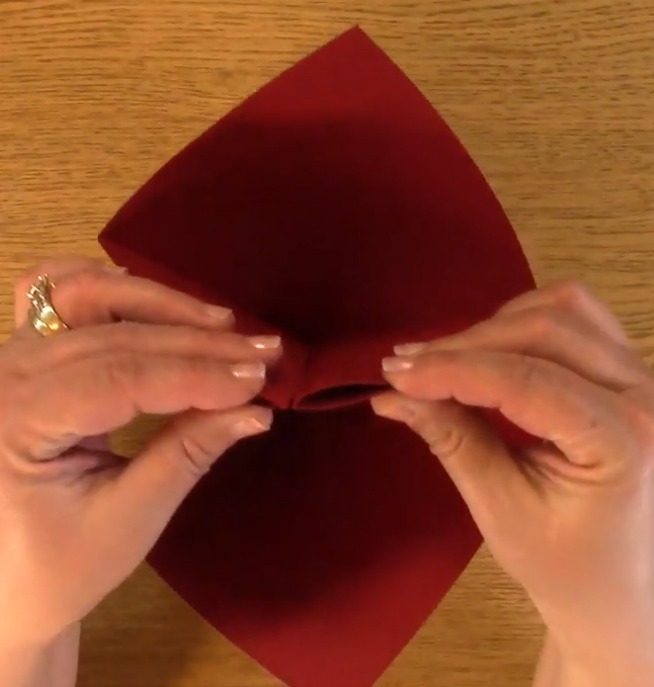
This is the inside page already folded. Although it may look complicated. There are only 3 folds for one page of the Explosion Mini Book Part 3. Trust me! YOU CAN DO THIS!

Take your paper and fold it in half as shown above. Use your bone folder to ensure the crease is strong.

Turn your paper a quarter turn and fold your paper. Once again, be sure to use your bone folder to ensure a strong crease.

This is what it will look like once you have completed 2 of the three folds for your Explosion Mini Book Part 3.

For your last fold, fold your paper to create a triangle as shown above.

This is what it looks like once it has been folded. Pretty simple, right? Now, we just need to invert a few of the folds we created.

Now we just need to invert a few of the folds we created. The triangle folds need to be folded the opposite way they currently are. The right is correct the left still needs to be folded up.

Here is a better picture as to how we need to fold both of the triangles toward the center of your paper.

Once your folds are correct, your paper will look like this.
Take both triangle sides that you just refolded the correct way and bring them both to the center of your paper as shown above.

This will leave the square sides fanned out. Take the left side of your paper toward the center of your paper.

You will repeat this for the right side as shown above.

Using your bone folder, ensure all four sides of your paper have a reinforced crease.

This is what it will look like once you have it folded properly.

Repeat this so that you have three of these for the inside of your Explosion Mini Book.
You have finished the Explosion Mini Scrapbook Part 3 Project!

For this weeks giveaway, we are once again giving away $15 credit to our store!
For last weeks giveaway, we are giving away $15 credit to our store!
The winner is Cynthia C.
Please be sure that you send me a message letting me know which post you won on and your contact info and I can send your code for your store credit to you!
Winners, please send me an message HERE and I will get your prize out to you!
For all of our giveaways including this one, in order for you to qualify for an entry to win, you would need to be a follower on YouTube, subscribe to our mailing list/blog posts (found on our blog page) and you may also comment on this blog post for an additional entry to win! When you subscribe, you will receive an e-mail on Mondays with our latest blog post. BE SURE TO READ IT to check to see if you are a winner EVERY WEEK. If you do not contact me within two weeks of the announcement of winning, you will forfeit your prize. NO EXCEPTIONS. Thank you for your understanding.
NOTE: If you are subscribed with two different names and I am unable to match you with your subscription to the blog and the YouTube Channel, you will be ineligible to win as I can’t decipher if you are a matching subscriber to both. Thank you for your understanding.
We hope you will subscribe to our YouTube Channel, Blog/Newsletter updates and check out our website!
As always, we appreciate your visit and we hope you enjoyed going on A Creative Journey with Melissa.


